Tuesday, March 17, 2009

Tutorial Tuesday: Hair Bows

I found this super cute, and EASY tutorial at Savvy N Sassy which is a fun place to find all sorts of things to do with ribbon. Definitely worth a trip over in their direction. So many projects you could do. And if you're like me with a stash of ribbon that's too good to throw away, it puts them to good use.

Supplies Needed:
-Ribbon (grosgrain works best)
-Thread
-Large Needle
-Hot Glue Gun
-Ribbon/Fabric Scissors
-Lighter (or fray check or similar product)
-Barrette Clips
-Aligator Clip (optional)

1. Gather your supplies. If you don’t have thread that matches perfectly, don’t worry about it. Thread your needle and double the thread, tying a knot at the end.

2. Make your first loop–this will determine the size of the bow

3. Continue to make loops, crossing the ribbon back and forth. You can do two loops, three, or more!

4. I use an aligator clip to hold the bow, while I get ready to stitch.

5. Find the center of the bow and work your threaded needle all the way through.

6. Push needle through the bow and then pull on the thread to gather the ribbon. When you get it gathered as much as you want it, wrap the thread around the stitching several times until you know that it won’t move.

7. Secure with several stitches through the back of the wrapped thread. When it’s completely secure, cut off the excess thread.

8. Cut off excess ribbon at an angle and make sure both tails are the same length

9. Use lighter flame or fray check to seal the edges of the ribbon tails.

10. Pop the “spring” part out of the clip.

11. Apply a line of hot glue to the back of bow.

12. Immediately press clip into hot glue and set aside (do not play with this or touch anything for a few minutes–otherwise you’ll get those annoying “strings”)

13. In the meantime, tie a single knot in a small piece of ribbon (this can be the excess you cut from the bow, or a contrasting color)

14. When the glue is completely cool, put a small drop of glue in the center of the clip.

15. Stick on one end of knotted ribbon.

16. Apply another dot of glue on top of the glued end wrap the other end of the knotted piece over and adhere.

17. Once glue has totally cooled, pop the “springy” part of the clip back in and you’re done!

Monday, March 16, 2009

Monday Moments: The Public Temper Tantrum

If it happens, it happens only in a public place.

The first time it happened with my kid, I was pregnant with surprise baby #2, in the middle of midterms at school and completely exhausted. These days Bryson still takes naps. Against my better judgement, I took him to church in the middle of the afternoon. I want him there and I want to be there. Just church from one to four o'clock doesn't exactly coincide with our nap schedule.

On this particular occasion, I had yet to make it through even half of sacrament meeting and Bryson was done. I vented a mental, crap!, and quickly took him out into the foyer. Not wanting to let him into the habit of playing all through church, I tried to keep him either on my lap or in my arms. Being pregnant makes this uncomfortable and my patience wears thin at the slightest annoyance. Before long, Bryson was playing in the curtains in the foyer. Great.

Long story short, we made it through the entire sacrament meeting without incident and then it came to hour number two. Attempting to hand him off to dad so I could go participate in my duties is when the whining commenced. Bryson screamed, took off running and literally flung himself on the floor a few aisles down.

So here is my dilemma: What do you do? All the great parenting books say to remove them from the area and give them a time-out in the car. Yeah. Right. Toddlers consistently have tantrums at the most inopportune moments, usually when everyone is tired and has a handful of things to do. I was not about to abandon my responsibilities on account of my screaming kid. You can give in to what the kid wants. Again, yeah right. Bryson may have been tired, but that was one fight from which I was not about to back down. I didn’t want Bryson to learn that to get what he wants, all he needs to do is throw an incredible fit.

So please, share all your mothering wisdom and tell everyone what works for you!

Friday, March 13, 2009

Freebee Friday: Easter Eggs

Thanks to everyone who participated in our last Freebee Friday. The winner selected from Random.org was one of our new bloggers Ruth. I will be contacting you via email and you'll have one week to claim your prize. Congratulations on winning the personalized Address Book!

This week our Give-Away entails a set of 3 handmade String Easter Eggs. These are a great addition to your Easter decor. They can be used a centerpiece on your table, or if you have archway's, they look really cute hung from them. After our Give-Away I will be posting a tutorial on how to make these - it's a really fun project to do with kids.


TO ENTER:
1 Entry: Create a new post about this Freebee Friday on your blog & leave a comment here! {Please leave your email address if it is not on your profile}

1 Entry: Become a follower of My Tiny Sweet Cheeks

1 Entry: Add a My Tiny Sweet Cheeks button to your sidebar!

Give-a-way ends March 19th 11:59 pm

The lucky winner will be selected by Random.org and will be notified by email. You will have one week to respond and claim your prize or another random winner will be chosen.

Thursday, March 12, 2009

Thrifty Thursday: Easy Instant Centerpieces

Here are a couple of easy ways you can make a quick centerpiece for your table with the help of some ordinary things that you probably already have around the house.

1. Secure a pillar candle or a few votive andles to an aluminum pie pan by melting some wax from the bottom of the candles onto the pan. Add a thin layer of water or sand, and put in several rose petals or seashells.

2. Add a cozy, country feel to your table setting by creating a natural candleholder. Use an apple corer to carve a hole three-quarters or the way down into a pair of large apples, insert a tall decorative candle into each hole, surround the apples with a few leaves, branches, or flowers, and voila! You have a lovely centerpiece. {You can also core the apple only a fourth down and put in a votive.}

BONUS TIP: Don't let loose candles spoil the romantic mood or cause a fire at your next candlelight dinner. If the candles don't fit snugly into the holder, wrap layers of tape around their bottom edges until they fit just right.

Wednesday, March 11, 2009

Workin' Wednesday: Baby Bug Creations

One of our faithful readers Melissa introduced me to Baby Bug Creations this week. What a super cute, fun site!

Ashley began Baby Bug Creations when her son was born. Wanting to stay at home with him, but finances not allowing it, she needed to find something to bring in extra income. While debating what to do, a close friend suggested she see what people thought of personalized wooden letters. That's where it all began!

Ashley creates personalized custom items for moms & babies. How many of us can't afford those outrageous boutique prices? That's what Baby Bug Creations is here for! Everything on her site also makes a great gift for new parents or for the mom-to-be.


She's also having a great give-away this week, so head on over to Baby Bug Creations and check her out!

Tuesday, March 10, 2009

Tutorial Tuesday: Mother's Day

Here's a quick and easy card you can make for Mother's Day. {Grandma's LOVE them!}

All you need to do is roll out a circle of paper clay {sold at Michaels and Roberts}
Push the child's hand in the clay. Then let the hand print dry for a day.
When dry, glue it to your choice of card stock. This would also look cute framed in a shadow box.

*Paper clay is very light so it won't way down the card at all. You can also paint paper clay.

Monday, March 9, 2009

Monday Moments: News

Sorry this is late being posted ladies. I wanted to be able to share my good news with you all, complete with a picture!


I am expecting again - just hit the 12 week mark - and am so excited! I am due September 21, 2009 which seems so far away. Lucky me, being all big during the summer months.

Any advice for a second baby?

Friday, March 6, 2009

Freebee Friday:

First of all, thank you to everyone who entered Baby Blvd. & Accessory Ave.'s Give-Away! It was awesome - make sure to check back with her often!

Second, thank you to those who commented here! Those who participated will be receiving an email from me shortly that you'll need to respond to in order to claim your prize. Our freebee surprise for commenting on My Tiny Sweet Cheeks is super cute Spring Banner!

This week's Freebee is a custom pocket-size address book. Made with love by moi in any of the colors and style you love the most! I've never made two the same, so yours will be one of a kind.

{I've never taken pictures of the ones I have made, but this will give you an example of what they are like}


TO ENTER:
1 Entry: Create a new post about this Freebee Friday on your blog & leave a comment here! {Please leave your email address if it is not on your profile}

1 Entry: Become a follower of My Tiny Sweet Cheeks

1 Entry: Add a My Tiny Sweet Cheeks button to your sidebar!

Give-a-way ends March 12th 11:59 pm

The lucky winner will be selected by Random.org and will be notified by email. You will have one week to respond and claim your prize or another random winner will be chosen.

Oh, and don't forget to SPRING forward this weekend with Daylight's Savings!

Thursday, March 5, 2009

Thrifty Thursday: Caring For Your Car

Our cars have become extensions of our homes in these fast-paced days, so keeping them working well and looking good is essential. Though most serious car repairs must be done by a mechanic, here are a few tricks to know:

For a sparkling windshield,
clean the glass with club soda. It will remove bird droppings and greasy stains from the surface, and the carbonation speeds the cleaning process.
If you have a small crack or nick in your windshield,
stop it from spreading by filling it in with clear nail polish on both sides of the glass. Do the repair in the shade, but move the car into the sun to let the polish dry.
Hiding small scratches on dashboard gauges is easy. Just rub the plastic with a bit of baby oil.
Give worn vinyl upholstery a quick pick-me-up by rubbing it with a small amount of bath oil on a soft cloth. You can also wipe the dashboard, armrests, and other plastic surfaces. Polish with a clean cloth to remove any excess oil.
Small dents getting you down? Grab your plumber's plunger, wet the edges, and just pull those dents out.

Wednesday, March 4, 2009

Workin' Wednesday: Cooper Jax

I'm in love with accessorizing my little man. Unfortunately, this is not always easy. Many products are geared towards little ladies, and it seems that anything boy is either sports or animal related. There's very little fabric variation and so I spend a lot of my time looking for things that stand out. Cooper Jax is a fabulous blog/shop I have come across. Pretty sure I want everything offered. While there are fabulous and cute girl accessories too, today I'm focusing on the boy items.

There are trucker style hats, as well as those Beanie/Skater hats with the little visor brims. Too cute!!
I also love these cuffs. How adorable - can't you just see your little man sporting one of these. They come in numerous styles and can have either velcro or snaps depending on your preference.
Definitely check out Cooper Jax and see all the darling products. I promise you won't be let down!

Tuesday, March 3, 2009

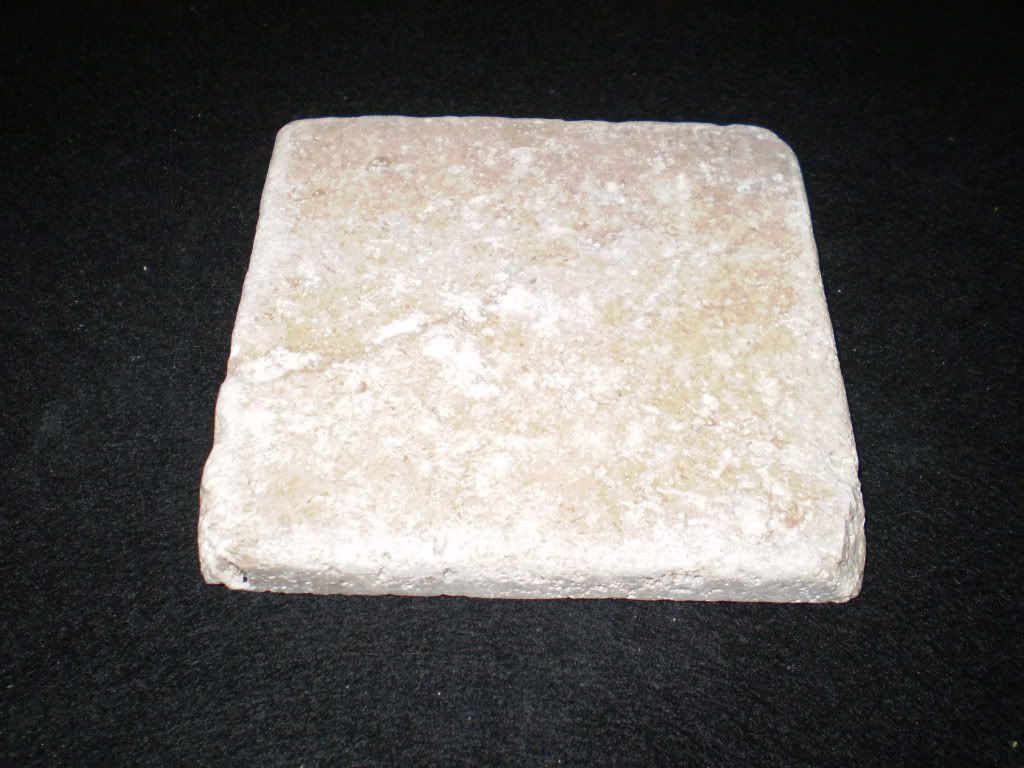
Tutorial Tuesday: Tile Coasters

I love coasters. In fact, I'm a tad anal about using them around the house. I found this tutorial HERE and thought I would bring it to you. I have another really cute coaster idea I am working on and will bring to you shortly, but here is a fun, DIY, cheap idea for any one who needs gifting.


Supplies
4 x 4 tiles {You can get these at Lowe's or Home Depot from 35 cents a piece and up}
StazOn Stamping Ink {Permanent stamping ink}
Self Adhesive Felt {Find at Wal-Mart or any hardware store - I used the ones that go on chair legs}
Stamps
Sealer {I used a matte finish poly spray}

Directions
1. Rinse and dry tiles.

2. Place dry tile in center of your work area.

3. Select your stamp color.

4. Select your stamp.


5. Ink entire image, taking care to wipe off any excess that may have gotten on the edges of the stamp.

6. Line up stamp and press stamp with steady pressure onto tile.

7. Fill in any spaces in the image on the tile with permanent marker of the same color.

8. Let ink dry for 5 to 10 minutes, then place tile onto a cookie sheet and place in oven preheated to 375 degrees for 12-15 minutes. You can also let these stand over night for the same effect.

9. Let cool completely.

10. Spray with sealer and let dry completely.

11. Place pieces of self adhesive felt to the bottom of the tile.

12. Tie coasters together with ribbon for gift giving.

Monday, March 2, 2009

Monday Moments: Giving Back in March


This month, allow me to introduce our Giving Back project: Shriner's Hospital for Children. Shriners Hospitals for Children is a one-of-a-kind international health care system of 22 hospitals dedicated to improving the lives of children by providing specialty pediatric care, innovative research and outstanding teaching programs.

Children up to the age of 18 with orthopaedic conditions, burns, spinal cord injuries and cleft lip and palate are eligible for admission and receive all care in a family-centered environment at no charge – regardless of financial need.

Shriners Hospitals has been helping kids defy the odds since 1922.

My Tiny Sweet Cheeks will donate 100% of its proceeds from this month's feature item, Easter Eggs, one of our new spring bibs. Available with pink or yellow ribbing, it's the perfect addition to a boy or girls mealtime attire. Super cute! Please help make a difference in a little one's life.

Click HERE to purchase one now, or HERE to donate without making a purchase.

Thank you for all your help and support!Link

**NEW** Spring Terry Cloth Bibs

These are the greatest bibs ever! Made of terry cloth, they are super soft and super absorbent. Measuring 14" x 9" the ribbing stretches large enough to accommodate babies and toddlers alike. The best thing about them? You child can't pull them off since there are no snaps, ties or velcro!

Spring Flowers
{with white or yellow neck ribbing}

Hippy Swirls
{with blue or pink neck ribbing}

Flutterby
{with pink or yellow neck ribbing}

Flower Power
{with pink neck ribbing}

*MARCH FEATURED ITEM*
Easter Eggs
{with pink of yellow neck ribbing}

Peter Cottontail
{with white neck ribbing}

Chicklet
{with yellow neck ribbing}

Butterfly
{with purple neck ribbing}
*NOTE* The picture didn't turn out swell, but the bib is pink with a purple embroidered butterfly


Winter Bibs


Winter Bibs


**NEW** Ring Binky Clip

This newly designed Binky clip is awesome for all those pacifiers with a ring attached to the mouthpiece. Simply snap the loop through the ring, and attach the cute over-sized button to your little ones clothes. Easy as that!

As a side note, this design was found on a tutorial HERE at Make It & Love It if you'd rather spend the time making it yourself.


$3.50+S&H


**NEW** On-the-Go Bib Clip

Take a look at our new On-the-Go Bib Clip. These are perfect to throw in a diaper bag or purse, then use a paper towel or napkin at a restaurant as your little ones bib. Cute, simple, and when you're done, throw away the mess!


$3.50 +S&H