

.jpg)


Sunday, November 29, 2009
Tuesday, November 24, 2009
National Family Week
Day 24
My siblings.
~~~
My siblings.
~~~

In case you haven't noticed, I LOVE my family. Honestly, they are my best friends and I talk to all of them all the time. {Really I do, just ask my husband about our cell phone bill!} It wasn't always fun growing up with a large family {you know how kids bicker} but I can't imagine life without them and am so grateful we get to be together for eternity.
This is National Family Week. Take advantage and make some memories with your family and be sure to tell them how much you appreciate them!
Click on the links for some great information on Building a Strong Family, or Family Home Evening.
Monday, November 23, 2009
Day 21
Epidurals.
Day 22
Humor and Laughter.
Day 23
Traditions.
~~~
Epidurals.
Day 22
Humor and Laughter.
Day 23
Traditions.
~~~
This is the time of year when it seems so many family traditions start to come out of the wood-works and remind you of times past. We have some great family traditions, though some may be a little corny, I have such great memories of all of them!
- Vegetable soup and spider rolls on Halloween
- Watching a Christmas movie after Thanksgiving Dinner
- Yum Yum Coffee Cake Christmas morning - maybe I'll share the recipe :)
- Christmas Eve Dinner (as opposed to Christmas Day)
- Doing a service project on Christmas Day
- Renting a cotton candy machine New Year's Eve and letting all the neighborhood participate in the fun
I'm sure there are more, but my brain just entered into funk mode.
What are some of your family traditions???
Friday, November 20, 2009
Day 20
A kitchen that's always full compared to many in the world.
~~~
A kitchen that's always full compared to many in the world.
~~~
For those of you who have never been to Cafe Rio, I feel sorry for you. Enjoy this homemade version of their Sweet Pork. It's nearly identical.
You need:
3 lbs. Pork
12 oz. Blended Salsa
1 can Coke
2 C Brown Sugar
1. Cook pork in crock-pot for approximately 5 hours.
2. Empty water and shred pork.
3. Place shredded pork back into crock-pot.
4. Add remaining ingredients.
5. Cook for another 3 hours and keep warm until served.
You need:
3 lbs. Pork
12 oz. Blended Salsa
1 can Coke
2 C Brown Sugar
1. Cook pork in crock-pot for approximately 5 hours.
2. Empty water and shred pork.
3. Place shredded pork back into crock-pot.
4. Add remaining ingredients.
5. Cook for another 3 hours and keep warm until served.
Tea Rose Home Mannequin Tutorial
For reals? I am so in love with this. I don't even care that she thinks it isn't perfect. It's practically the most darling thing I have laid my eyes on in forever. If only I didn't think my little man would destroy it. But it's going in my stack of things to come once my little miss has her own room.
Check out Tea Rose Home HERE for more awesome ideas.


I can use this to make a mannequin! Just in case you want one, here is how I did it.
You will need:
Torch Stand
Wooden Dowel
One can of white spray paint(make sure that it is the kind that is made for metal and plastic)
Old blanket or Bath towels
Batting
Muslin
Iron or wood decorative top
Glue gun, needle and thread
How to:
1. Put the wooden dowel into the torch stand and tighten the screw. Spray paint the whole thing.

2. Cut several peices of 4" wide batting for the neck. Glue the first part to the dowel and start wrapping it tightly, until you get the thickness you want. You can either sew the end or glue it.

3. Using the same method, wrap the old towel or blanket to the dowel. I folded the old blanket and made it 15" tall for the body.

4. Add batting around the neck area to make a more natural and smooth look.

5. Cover the whole thing with batting. It was easier for me to sew it on to the body. I felt like I had more control and compared to using the glue gun, it is less permanent.

6. Cover the whole body with muslin. This part is a little tricky. Especially around the neck area. Sew the body part first, then the bottom and the top.

7. Around the neck area, you will need to cut some excess fabric off. Use the glue gun to secure the fabric to the top of the dowel as you make pleats.

8. I sewed lace around it.

9. Then, screw in the topper for the finishing touch.

10. Done!

and, the mannequin with some clothes on...

Thursday, November 19, 2009
Day 18
Music.
Day 19
Friends. New and old.
~~~
Music.
Day 19
Friends. New and old.
~~~
For the first time in a long time, I don't have to do Thanksgiving. Weird. I have hosted the event for the past three years, so it's nice to have a break. What is so weird about it, however, is that I don't have to do anything. Nada. Zilch. Usually when you don't host the feast, you still have an assignment. Not this year -- so I'll leave you to drool over the amazing Martha Stewart centerpieces that I would be working on (or tweaking to fit my schedule). And remember, there's still time for you to do the same.


Tuesday, November 17, 2009
THOSE days
Day 17
Memories in the Making
Memories in the Making
~~~
Well, it's been one of THOSE days. You all know the one I am talking about. It started about midnight when Aniston refused to fall back asleep after nursing. I'm already deadbeat tired, thinking, "How can someone so small cause so much irritation?" And then she smiled and all my frustration melted away, but I was still tired. So I woke up my DH to take over...mwhaha...perks of him being a stay-at-home dad while I finish up school. I handed her off and hit the sack.
Then at two a.m. I heard Bryson screaming in his room. So I take the baby back (who is now sleeping peacefully ... Daddy's girl) and let him deal with the frantic "Daddy Daddy" resonating through the walls ... Daddy's boy. {Notice, nobody apparently wants me around.}
Eventually we made it through the night, through the day of school, made the Mickey Mouse cupcakes for the birthday party, set up the tool workbench, got the online test taken, paid the bills, read the mail, got both babies to sleep, and are left to our own accord for a few minutes until one of them wakes up.
I guess the best thing to do at this point is just saddle up and remember that sometimes that's all you can do. Bryson had a great birthday. Aniston is getting her sleep. And I have a hot, adoring husband, and beautiful kids. I suppose this day hasn't been so bad after all. Only thing that could have made it better was if I'd fit in some crafting somewhere...
Monday, November 16, 2009
Zippered Flowers
Day 14
My health - and modern medicine for those days when I'm not up to par.
Day 15
All the great books in the world.
Day 16
Birthdays -- Happy Birthday to my 2 year old boy!
~~~
My health - and modern medicine for those days when I'm not up to par.
Day 15
All the great books in the world.
Day 16
Birthdays -- Happy Birthday to my 2 year old boy!
~~~

So I saw this necklace in a magazine and thought, "How cool is that?" It's chic and definitely something you don't see walking down the streets of Arkansas everyday. Maybe New York. But not Arkansas. So...rather than spend the $40 I set out for a tutorial on how to make one. I came across this sweet tutorial and chose to share it with you, because like its author, I agree all the other zippered flowers were too pointy. I LOVE that this girl is only 15 -- maybe we'll see her on Project Runway in a few years. Either way, enjoy! And put some old zippers to fashionable use!
Supplies
+zipper(s) with exposed metal teeth (the longer your zipper, the bigger the flower. I used several and sewed them together. Look for a bin of reject zippers in a fabric shop. They're much cheaper and work just as well.)
+scissors
+needle
+thread that corresponds to the color of your zippers
+an hour or two of your time

1. Unzip your zipper. Cut through the teeth on each side, as close as possible to the pull, on both sides. If you are using multiple zippers, do this to them as well.
2. On all except for one zipper half, cut the flap of fabric on the other end, as close as possible.
3. Take the one zipper half with the end flap remaining. Tightly roll the fabric flap to form the basis of the flower bud. Secure with a stitch or two.
4. Wrap the zipper around the bud, spiraling downward so the teeth do not overlap. Continue until the bud of the flower is the size that you'd like.

5. Fold the zipper fabric, making a little pleat, and secure it with a stitch.
6. Stitch the edge, near the fold, of the zipper fabric to the bud. Continue stitching and pleating, every half inch or so, wrapping the bottom of the zipper around. (I know this sound complicated, but I promise once you start you will get a feel for it)
7. Once you're through stitching your zipper, stitch the end of it to the middle of the backside of the rosette.
8. If you are adding another zipper half, simply stitch it where the other half left off. Continue until the rosette is the size that you'd like it.
Sunday, November 15, 2009
My $3 weekend
What I've been working on...and there's still more to come!
Foam Wreath and Book $2 {from Dollar Tree}

Stickers $1 {Dollar General}
Friday, November 13, 2009
Creative People
Day 13
Truly creative people who inspire me daily!
~~~
Truly creative people who inspire me daily!
~~~
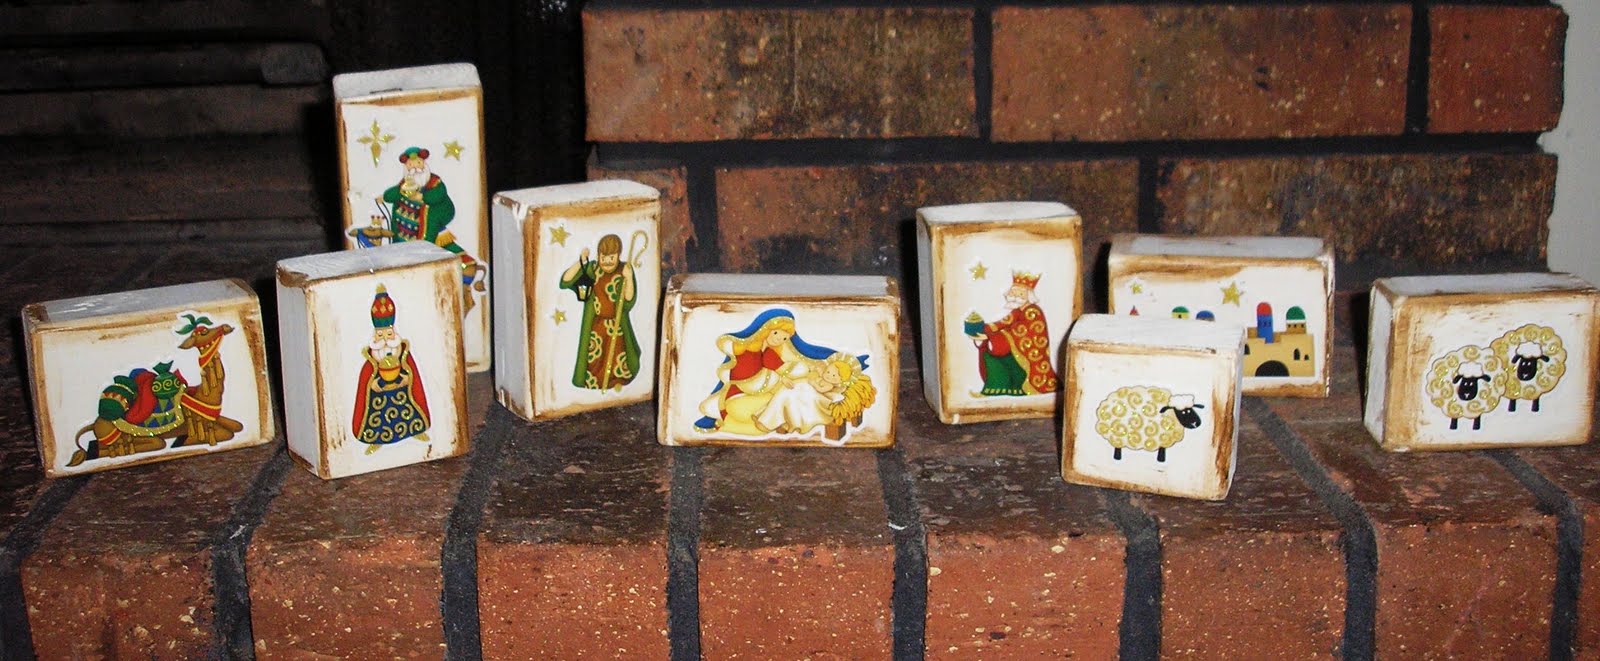
This is definitely going to be one of my Christmas gifts being given away this year. I am so excited to have one. Doesn't it just give you that sheek, urban feel? You know the one, before your kids ruined it.

Loving these blocks - indestructable for all those little hands you want to play with baby Jesus. Also, you can do your own variations and designs if you so wish!

This is such a beautiful, unique bracelet. Who cares if the pearls are real or not? All I know is, everyone will be wondering where you got it.

I know where this is hanging in my living room. And it's getting made this weekend.
 P.S. Happy Friday the 13th!
Thursday, November 12, 2009
Pumpkin Sheet Cake
Day 12
Fall eats and treats!
~~~
In a mixing bowl, beat 1 can (15 oz.) solid pack pumpkin, 2 C sugar, and 1 C vegetable oil.

Fall eats and treats!
~~~
I love the flavors of Fall (and the colors, and smells, and overall atmosphere!) But one of my favorite thing to do is eat! There are a lot of foods I only eat in October and November. Don't ask me why...I guess something about them just screams "FALL!" This is a super easy, super yummy pumpkin sheet cake, and lucky you, I'm sharing the recipe. This has actually replaced pumpkin pie on Thanksgiving at my house.
In a mixing bowl, beat 1 can (15 oz.) solid pack pumpkin, 2 C sugar, and 1 C vegetable oil.

 Add 4 eggs, lightly beaten.
 Combine 2 C all-purpose flour, 2 tsp baking soda, 1 tsp ground cinnamon, and 1/2 tsp salt. Add to pumpkin mixture and beat until well blended.
 Pour into a greased jelly roll pan (15x10x1). Bake at 350* F for 25-30 minutes until the cake tests done.
 While waiting, set out 1 pkg. of cream cheese and 5 Tbs butter to soften. I ALWAYS forget to do this!
 Let your cake cool. Read a book. Take a walk. Blog!
 For the frosting, I never do exact measurements, but I'll do my best to give you some. Beat the cream cheese, butter and 1 tsp. vanilla until smooth. Gradually add 1.5 C to 2 C powdered sugar. Add enough milk for the frosting to reach the desired spreading consistency. {Sorry, I guess I missed pictures for this step.}
Frost cake. And for those of you who ruin things with nuts, I suppose it's OK if you sprinkle some on top.

Here's the recipe again, minus pictures for your convenience.
1 can (15 oz) solid pack pumpkin
2 cups sugar
1 cup vegetable oil
4 eggs, lightly beaten
2 cups all-purpose flour
2 tsp backing soda
1 tsp ground cinnamon
1/2 tsp salt
Frosting:
1 pkg (3 oz) cream cheese, softened
5 Tbs butter or margarine, softened
1 tsp vanilla
1.5-2 cups powdered sugar
3-4 tsp milk
chopped nuts (optional)
In a mixing bowl, beat pumpkin, sugar and oil. Add eggs, mix well. Combine flour, baking soda, cinnamon and salt: add to pumpkin mixture and beat until well blended. Pour into a greased jelly roll pan (15x10x1). Bake at 350* F for 25-30 minutes until cake tests done. Cool.
For frosting, beat the cream cheese, butter, and vanilla in a mixing bowl until smooth. Gradually add sugar; mix well. Add enough milk until frosting reaches the desired spreading consistency. Frost cake. Sprinkle with nuts, if desired.
Wednesday, November 11, 2009


Tuesday, November 10, 2009
Knit Sweater Pillow Tutorial
Day 10
A soft place to lay my head after a long day
~~~
A soft place to lay my head after a long day
~~~
Here's a great and easy tutorial to make a knit sweater pillow by My Mama Made It found HERE.
It's a great way to take a sweater of someone you love and memorialize them or an old sweater of your childs that you just can't give away.
Get whichever sweater you want.

Cut off the sleeves and any excess you may need to to create straight lines all the way around.

Turn the sweater inside out and pin it ALL the way around. We are going to sew all four sides shut because we will just stuff it from the front buttons. After pinning, Sew all four sides.

Turn the pillow right side out and open the buttons.

Get some stuffing and stuff the pillow as full as you like it.

Now, button the pillow back up.
 Here's what it looks like!!
Didn't it turn out beautiful!! And it took me 15 minutes!

Here's the first one I did that's on my bed.

Monday, November 9, 2009
Staying In Love
Day 7
My Faith.
Day 8
The ability to fly thousands of miles in just a few hours.
Day 9
For the wonderful husband I have.
~~~
Found HERE at How Does She?
My Faith.
Day 8
The ability to fly thousands of miles in just a few hours.
Day 9
For the wonderful husband I have.
~~~
Found HERE at How Does She?

1. Put the kids to bed early
2. Turn off the TV
3. Grab your sweet heart and ask him to dance (no one will be watching).
Click Here for the U-You Tube song (It’s Free)
Fall deeper in love!!
Friday, November 6, 2009
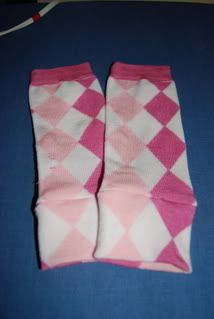
Day 6
Chunky baby legs that are cute naked or covered up.
~~~
I have been wanting some of those darling baby leg warmers, but am too stingy to play boutique store prices. You know me and thrifty go hand-in-hand. So, of course, I turned to my wonderful internet and found a tutorial HERE at Everything Your Mama Made and More. So glad resourceful women figure these things out for me.
I'm thinking of making a pair for myself too!
You Need:
Womens tube/knee socks (6m-6yr) or Womens crew socks (0-18m) Girls knee socks also work GREAT.
Sewing machine or needle & thread
Scissors
Pins
What to Do:
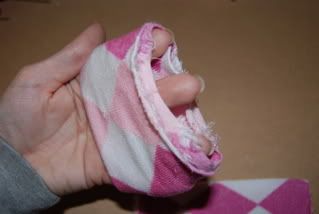
First cut the socks into sections as pictured below. You will toss the heel & toe scraps, but keep the bottom of the foot. Note: for this tutorial I am working with crew socks, but the process is the same as with tube socks.

Take the section remaining from the foot & you want to fold it inside of itself as pictured below. You should have the nice side of the sock on the outside & inside with a fold on one end & both raw edges on the other.
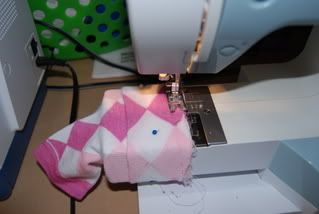
Stick the long section of the sock inside your newly created tube. This would give you 3 raw edges on the side we are going to sew, the other side will have the folded edge & the finished edge that was originally the top of the sock. If you have a pattern such as stripes or argyle as I used you may try to get them to line up. Once you are happy with the positioning pin together. Make sure to pin just 3 layers, not all 6 or you won’t have a hole to stick your little ones leg through when you are finished.

Time to Sew! Set the stitch length on your sewing machine to 4 (longest stitch), this will allow the most stretch. If the long straight stitch just doesn’t stretch enough for you can also us a narrow zig zag stitch… width at 2 & length at 3. You want to stretch the pinned side over the arm of your sewing machine & sew a straight stitch all the way around. If you can’t get it to stretch over then you can use what ever method you use to sew circles normally, or you can simply stitch it together with a needle & thread the old fashion way.
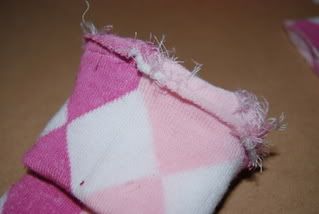
OPTIONAL Your finished seam should look similar to this. For a cleaner more professional look you can use pinking sheers, a zigzag stitch, or serge the seam for extra strength & to prevent unraveling.
Then simply fold the trim down (putting the seam inside) & TADA… a baby & toddler leg warmer simply make another one & test them out on the nearest happy child!
Subscribe to:
Posts (Atom)


